Monthly Archives: May 2017

iMac configuration

I mentioned previously how I’ve rehabilitated the 10-year old iMac. Today, I’ve been setting up the software environment.

First, I transferred my iTunes library over to the new computer.

Then I installed some non-Safari browsers: Chrome, Firefox, and Brave.

Then I set up Homebrew, and after that, ruby:

$ brew install openssl # various messages because Apple doesn’t like openssl
$ brew install sqlite pcre
$ git clone git://github.com/sstephenson/rbenv.git ~/.rbenv
$ git clone git://github.com/sstephenson/ruby-build.git ~/.rbenv/plugins/ruby-build
$ rbenv install -l
$ rbenv install 2.4.1 # (as of May 19, 2017)
$ hash -r # rehash your environment

Setting Up Homebrew on my New Old Mac

I set up Homebrew on my iMac. (If you go to their site, the Homebrew project has documentation there, which explains the whole not-use-sudo philosophy and using /usr/local now that Apple makes it hard not to, but I don’t understand it, so it seems like an invitation to having your machine rooted. But I’m a greybeard and I quit understanding internet security back when we used uucp because we didn’t have a real internet. Hopefully someone has thought it through.)

Because I’m too lazy and ignorant (and possibly stupid) to RTFM, I found a set of color-by-number instructions handy, although I didn’t use anything after XCode (a mere 4GB download) and Homebrew.

$ brew doctor
$ brew update
$ brew doctor
$ brew install {lots of good stuff}

At some point I ran into keg-only and Cellar jabber jabber messages, but (see above) I don’t understand any of that. I just take whatever advice brew doctor gives me and move on from there.

Some of the things I always want on a new Mac (or even one that’s 10 years old) include:

$ brew install imagemagick --with-fontconfig
$ brew install colordiff pwgen tree wdiff pstree
$ brew install pngquant
$ brew install jhead antiword poppler
$ brew install sox lame eye-D3
$ brew install gnupg
$ brew install sqlite

Moving iTunes from one mac to another

The biggest single reason I wanted to fix my old iMac was to put a honkin’ big HD in it, and the reason for that was so I could have an iTunes library on the main hard drive instead of an external (USB 2.0) drive. My iTunes Media folder looks like this:

32 Books
60 Tones
740 Home Videos
6886 Mobile Applications
10791 TV Shows
53041 Movies
84845 Podcasts
95847 Music

Why iTunes doesn’t let us manage our storage intelligently is a mystery (especially given the ridiculously small storage options that Apple provides its Macs, and all their other devices for that matter). But now I’ve got plenty of room to store 250 GB of media in the iTunes folder as well as the different places I keep it for real. So there.

The only problem was getting it into the iTunes folder, in a way that iTunes understands. But this is a known problem, and Apple has a documented procedure.

Then I had to Authorize my computer (the “new” iMac) and Deauthorize the old one (the Mac Mini). I don’t know how Apple keeps track of what computers have been authorized, but they decided this one was already Authorized, from back when it was our main computer. I don’t know if I forgot to Deauthorize it or what, but now I’ve only got 2 of 5 Authorized computers.

iMac Salvaged!

Mostly I’ve been blogging about my adventures in Linux-land. But I wanted to write a bit about my other project. About 9 1/2 years ago, we got an iMac, and about four years ago we replaced it with a Mac Mini.

The iMac was a mid-2007 20″ model. (This was the first Aluminum and Glass version, replacing the earlier white plastic models. You can watch Steve Jobs introduce the Aluminum Series on YouTube.)  The specs were: 2.0 GHz Core 2 Duo, 250 GB SATA, SuperDrive, and 1 GB of DDR2. It cost $1,220. The late 2012 Mac Mini that replaced it had a 2.5GHz Core i5, 500 MB SATA/5400, 8 GB DDR3) and cost $669, but we had to buy a monitor for it (a Samsung S23C570, which probably cost around $200). So the Mac Mini was definitely an upgrade.

But that wasn’t why we upgraded. It was because the iMac was barely working. The hard drive would go “tick tick tick” for the first hour or two whenever you started running it. The SuperDrive had quit working a couple of years earlier. (Technically, a DVD got stuck in it and could not be removed.) Plus the usual “I’m an old Mac so sometimes I just take forever to do things” that we’re all used to. We finally upgraded because we couldn’t trust that it would work any more.

So. Fast forward four years. I got tired of tripping over the iMac, but I couldn’t bear the thought of losing such a pretty computer. So …I fixed it. Or maybe I threw good money after bad and wasted my time fixing a ten-year old computer. Or both.

I watched a ton of how-to videos (this one was particularly helpful) and read the instructions over and over again. Oh, and before I did that, I got a set of tools from iFixit and parts from OWC (MacSales). Then, after putting it off all during Lent, I ran out of excuses after Easter. So I spent last Friday replacing the original 250 GB hard drive with a 2 GB drive and the SuperDrive with a 2.5″ 1 GB drive. Here’s what it looks like on the inside with the new drives.

iMac 20" (2007 model)

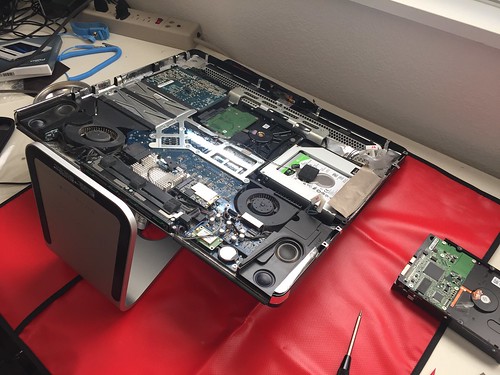
See more pictures of the work in progress on Flickr.

I will say that Apple sure doesn’t want you to make a bootable OS install disk. In spite of all the instructions they provide (here, here, and here). I own three Macs, but ((Shift+) Option+) Command+R doesn’t work on any of them. I finally dug up an old Snow Leopard install DVD and then upgraded to El Cap the slow and painful way.

Things I Did After Installing 17.04

Here in one place is my list of things to do after installing a new operating system.

$ sudo apt update
$ sudo apt upgrade
$ sudo apt install ssh

Then try to ssh into the computer. If needed, apply the fix to Zeroconf / Avahi / NSSwitch.conf.

Next:

$ sudo apt install git
$ sudo apt install colordiff
$ sudo apt install libreadline-dev
$ sudo apt install vim vim-gtk3
$ sudo sudo apt-get --purge --reinstall install ttf-mscorefonts-installer

Then I got things ready for ruby. I prefer rbenv:

$ sudo apt install libssl-dev zlib1g-dev # needed for ruby
$ sudo apt install sqlite3 sqlite3-pcre
$ cd ; git clone git://github.com/sstephenson/rbenv.git .rbenv
$ git clone git://github.com/sstephenson/ruby-build.git ~/.rbenv/plugins/ruby-build
$ rbenv install -l
$ rbenv install 2.4.1 # (as of April 28, 2017)
$ hash -r # rehash your environment

P.S. if later on you want a later version of ruby, the way you update the list of installable ruby’s is:

$ cd ~/.rbenv/plugins/ruby-build ; git pull

Then use gdebi to install Google Chrome.

$ sudo apt install gdebi
$ apt install chromium-browser chromium-codecs-ffmpeg chromium-codecs-ffmpeg-extra
$ apt install telegram-desktop

I’d love to be able to pre-populate Dropbox from a local backup when I setup a new computer. But I’m not smart enough, I guess.

$ sudo apt install antiword wv jhead
$ sudo apt install imagemagick poppler-utils